Tutorial: Unity, from a package sample to a WebGL build
Preview tools Not built by us Unity 2022 LTS or Unity 6
You will create a Unity project around a small 2D platformer sample, wire it to Vapour, add on-screen touch controls for phones, and build a WebGL export from the command line and from CI.
Read this first: we did not build this one. The machine we wrote the tutorials on has no Unity editor and no Unity license, so we could not produce a WebGL build. The Vapour side (the manifest, the touch layout, the build script and the CI file) was written from the CLI source and validated with real commands. The Unity side (menus, settings, the build itself) follows Unity's documentation and the sample's code, and is untested. If a step breaks, it is a bug in this page: please tell us.
Sample repository: vapour-computer/tutorial-unity-platformer,
branch vapour-tutorial. It is a fork of ta-david-yu/2D-Platformer-Hunter
(MIT), a raycast-based 2D platformer controller.
What is verified, and what is not
| Step | State |
|---|---|
vapour.toml and the touch layout validate |
Verified with vapour controller check and preview |
| The layout has no overlapping controls | Verified (screenshot below) |
VapourBuild.cs matches what vapour build expects |
Verified against the CLI source; it is the file vapour create --engine unity writes |
| The sample really reads the keys we map | Verified from its code (PlayerBasicMovementInput.cs) |
| Importing the package and its sample | Not run |
The WebGL build, vapour build, vapour test |
Not run |
| The CI workflow | Not run: it needs Unity license secrets |
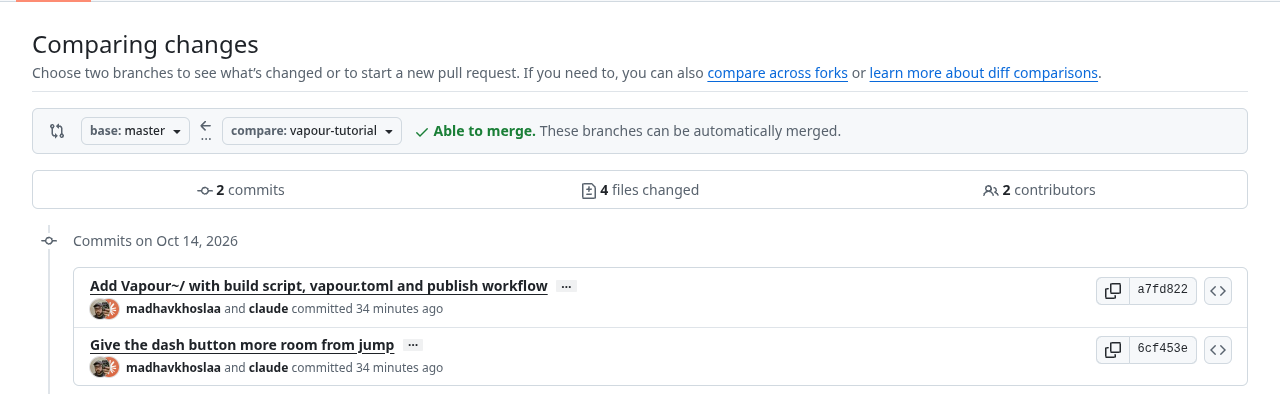
GitHub's comparison of the fork's branch with upstream shows exactly what we added: a single hidden folder.
1. Understand the sample
The repository is a Unity package, not a complete project. That is why this tutorial starts by creating a project.
It contains two playable scenes, 00-BasicController and 01-AdvancedLevel, in a sample called Playground Samples.
Its player script (PlayerBasicMovementInput.cs) reads Unity's legacy Input Manager: two axes, Horizontal and Vertical, and
two buttons, Jump and Fire3.
In a default Unity input setup those names mean:
| Name | Default keys |
|---|---|
Horizontal |
A and D, left and right arrows |
Vertical |
W and S, up and down arrows |
Jump |
Space |
Fire3 |
Left Shift |
That list is what the touch controls must press.
2. Create the project
In Unity Hub, create a new 2D project with a Unity 2022 LTS or Unity 6 editor.
3. Add the package and import the sample
In the editor: Window → Package Manager → + → Add package from git URL… and paste:
https://github.com/vapour-computer/tutorial-unity-platformer.git#vapour-tutorial
Then select the package in the list, open its Samples tab and click Import next to Playground Samples.
book/assets/img/unity-package-manager.png.4. Make the legacy input work
Check this one. New Unity 6 projects usually default to the new Input System package. The sample uses the old
Inputclass, which throws an error in that mode.
Open Edit → Project Settings → Player → Other Settings and set Active Input Handling to Input Manager (Old) or Both. Unity restarts the editor.
5. Put a scene in the build
vapour build runs Unity without a window, and the build script needs at least one enabled scene. Open
File → Build Profiles (older editors: Build Settings), then:
- Choose the Web platform and click Switch Platform.
- Click Add Open Scenes after opening
00-BasicController. The path will look like:
Assets/Samples/DY.2D Platformer Hunter/0.2.2-preview.1/Playground Samples/Scenes/00-BasicController.unity
book/assets/img/unity-build-profiles.png.Under Player Settings → Publishing Settings set Compression Format to Disabled, or turn on Decompression
Fallback. An uncompressed export is the simplest first build. Compressed files need the right Content-Encoding
headers from the server.
6. Add the Vapour build script
Copy Vapour~/Assets/Editor/VapourBuild.cs from the sample repository into your project at
Assets/Editor/VapourBuild.cs. It is the same script vapour create --engine unity writes, and you do not need to edit it.
What it does:
- It reads the output folder from the
-vapourOutputargument thatvapour buildpasses, and falls back tobuild/web. - It builds every scene you ticked in Build Settings, for the WebGL target.
- It throws if nothing is ticked or the build fails. In batch mode a thrown exception makes Unity exit with an error,
so
vapour buildand CI stop instead of publishing nothing. - The
[MenuItem]line adds Vapour → Build to the editor, so you can run the same code by hand.
7. Describe the game and the touch controls
Copy Vapour~/vapour.toml to the root of the project, next to Assets/ and ProjectSettings/:
[project]
title = "Platformer Playground"
slug = "tutorial-unity-platformer"
engine = "unity"
platform = "desktop"
version = "0.1.0"

[build]
dir = "build/web"

[controller]
mode = "keyboard-map"

[[controller.controls]]
id = "move"
type = "joystick"
x = 0.20
y = 0.74
w = 0.30
h = 0.30
up = "w"
down = "s"
left = "a"
right = "d"
deadzone = 0.15
sensitivity = 1.0
repeat_hz = 60

[[controller.controls]]
id = "jump"
type = "button"
x = 0.86
y = 0.70
w = 0.16
h = 0.16
key = "Space"

[[controller.controls]]
id = "dash"
type = "button"
x = 0.62
y = 0.80
w = 0.13
h = 0.13
key = "Shift"
The stick presses the keys behind Horizontal and Vertical; the buttons press Jump and Fire3. Every entry is explained
in the vapour.toml reference.
$ vapour controller check
Controller mode: keyboard-map
  move         joystick at (0.20, 0.74) size (0.30, 0.30)
    joystick tuning: deadzone=0.15 sensitivity=1.00 repeat_hz=60
  jump         button   at (0.86, 0.70) size (0.16, 0.16)
  dash         button   at (0.62, 0.80) size (0.13, 0.13)
Controller config looks good.
Tip: run `vapour controller preview` to see the layout.
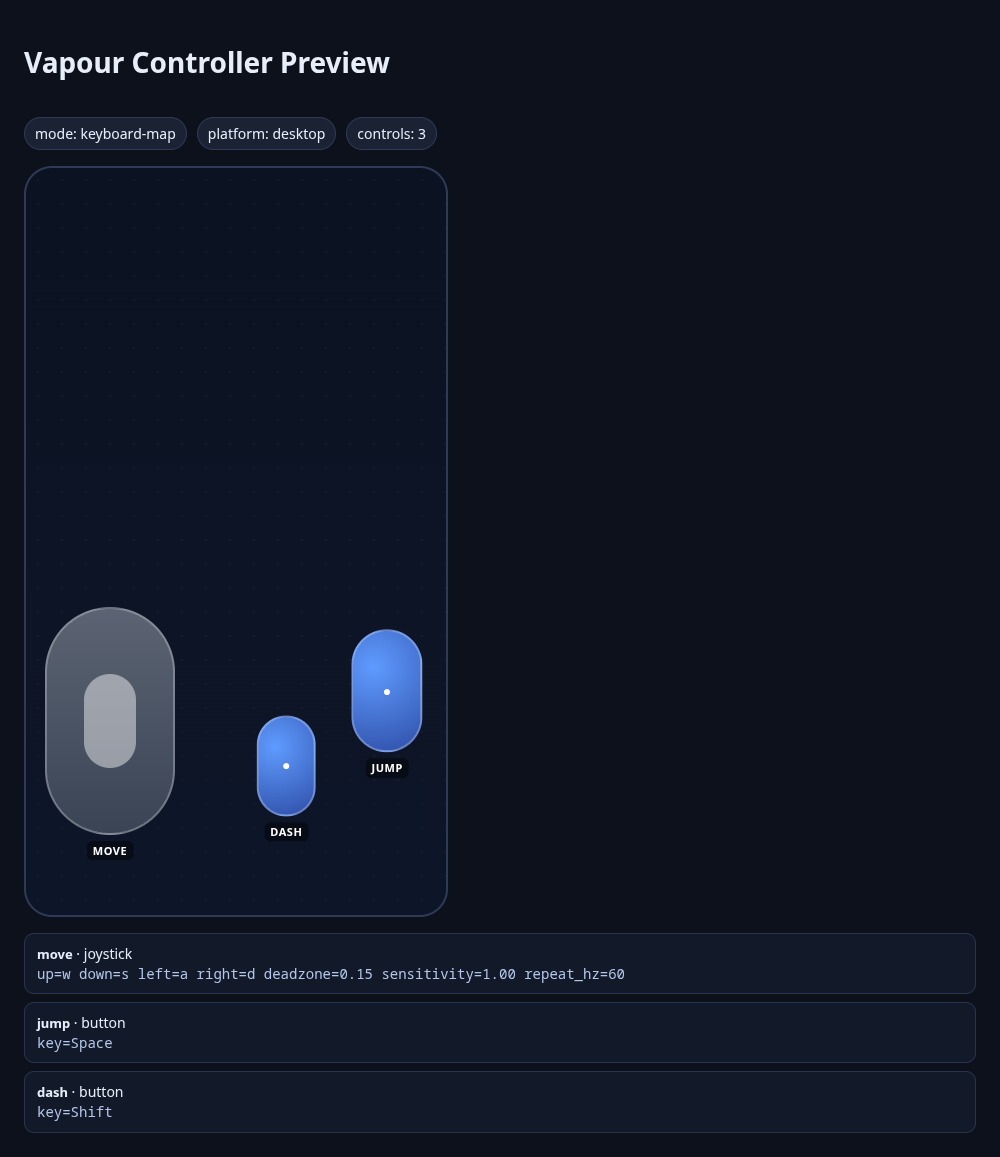
Check the key name.
Shiftis our best guess for how the player names Left Shift. If dash does not respond on a phone, this is the first thing to try changing. We could not test it against the player.
8. Build from the command line
vapour build needs three things: Assets/Editor/VapourBuild.cs, ProjectSettings/ProjectVersion.txt and
Packages/manifest.json. Tell it where your editor is:
export UNITY_EDITOR=/path/to/Unity/Editor/Unity     # or have `Unity` on your PATH
vapour build
Under the hood this runs Unity in batch mode:
Unity -batchmode -quit -nographics \
      -projectPath . \
      -buildTarget WebGL \
      -executeMethod Vapour.Build.Perform \
      -vapourOutput build/web \
      -logFile -
It then checks that build/web/index.html exists and writes .vapour/build.json, a list of every file with its size and
whether it is needed at boot. If your project has large content and the com.unity.addressables package is missing,
vapour build warns you to split it into remote Addressables bundles.
9. Run it locally
vapour test
You get your build in a Chromium window with an FPS overlay, and the profiler in a second tab. See Profile your game locally.
10. CI with GameCI
Copy Vapour~/vapour-publish.yml to .github/workflows/vapour-publish.yml in your project. It builds with
GameCI and publishes when you push a tag such as v0.1.0:
The workflow, in order:
- Runs when you push a tag that starts with
v, such asv0.1.0. - Checks out your project, including Git LFS files.
- Builds the
WebGLtarget with GameCI'sunity-builder, using your Unity license secrets. - Copies the build from
build/WebGL/WebGL/tobuild/web/, wherevapour.tomlexpects it. - Publishes with
vapour-computer/vapour-ci@v1, using yourVAPOUR_TOKENsecret and the tag as the version.
You need four repository secrets: UNITY_LICENSE, UNITY_EMAIL, UNITY_PASSWORD (see
GameCI activation) and VAPOUR_TOKEN
(create a token). Keep this in its own tag-only workflow: vapour-ci@v1 is not released yet, and
GitHub fails any job that references an action it cannot find (the Godot tutorial explains how we hit this).
GameCI writes the build to build/WebGL/WebGL/. That layout can differ between builder versions, so open the build log
and confirm the path before you trust the cp step.
If it does not work
| Symptom | Likely cause |
|---|---|
InvalidOperationException … You are trying to read Input using the UnityEngine.Input class |
Step 4: Active Input Handling is set to the new Input System only |
Enable at least one scene in Build Settings. |
Step 5: no scene is ticked |
install the Vapour/Build editor script from vapour create |
Step 6: Assets/Editor/VapourBuild.cs is missing |
UNITY_EDITOR or Unity is required; install it yourself or set UNITY_EDITOR |
Step 8: vapour build cannot find the editor |
| The page loads but the game never starts | Compressed build served without the right headers: set Compression Format to Disabled |
The sample's Input calls do nothing on a phone |
Check the key names in vapour.toml against step 1 |